2.3 | The Illustrator Interface & Your First Document
Key Terms
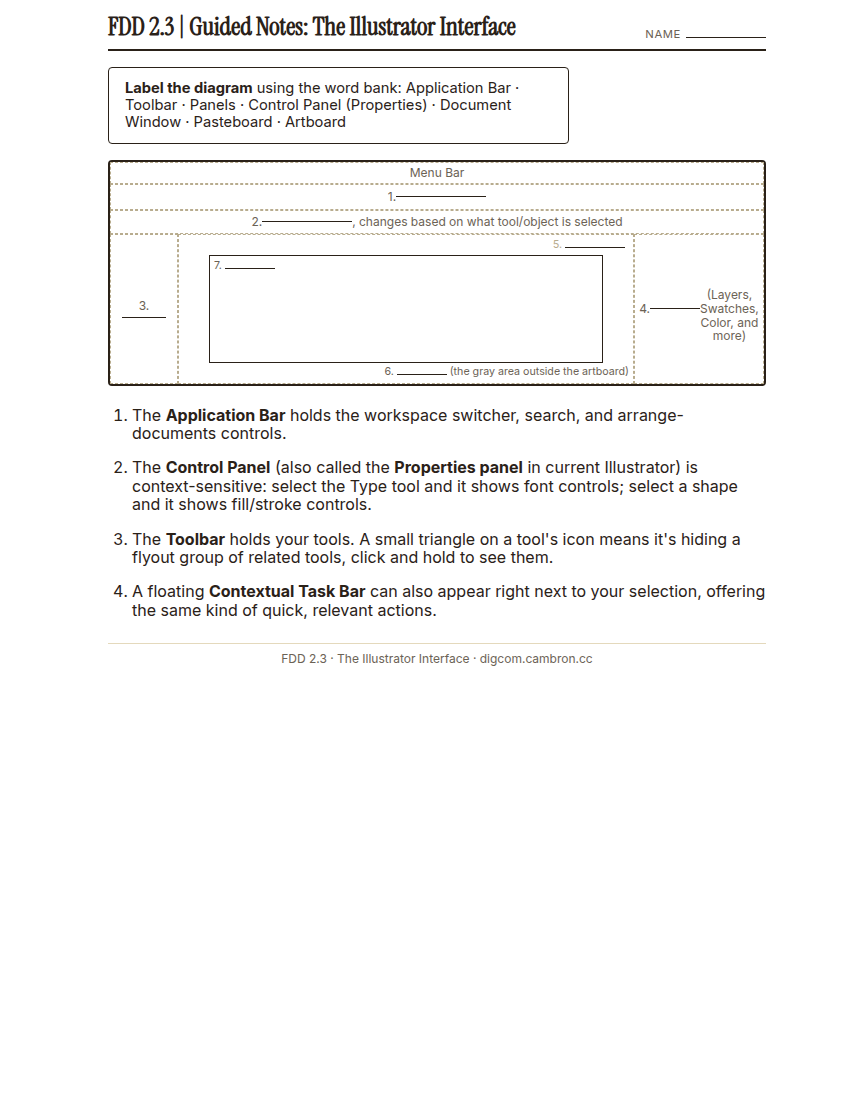
- Application Bar
- The bar running across the top of the Illustrator window, holding the workspace switcher, search field, and window-arrangement controls.
- Control Panel
- The context-sensitive options bar (also called the Properties panel in current Illustrator) that changes to show relevant controls for whatever tool or object is currently selected.
- Panels
- Dockable, collapsible windows (Layers, Swatches, Color, Align, and many more) that expose a tool’s or feature’s full set of options. Panels can be docked into the side column, floated freely, grouped together as tabs, or closed when not needed.
- Toolbars
- The column of tool icons (Selection, Pen, Shape tools, and more) along the side of the window. A small triangle on a tool’s icon means it’s hiding a flyout group of related tools.
- Contextual Task Bar
- A small, floating toolbar that appears near your current selection, surfacing the handful of actions most likely to be useful right now. The same idea as the Control Panel, but attached to your selection instead of fixed at the top of the screen.
- Artboards
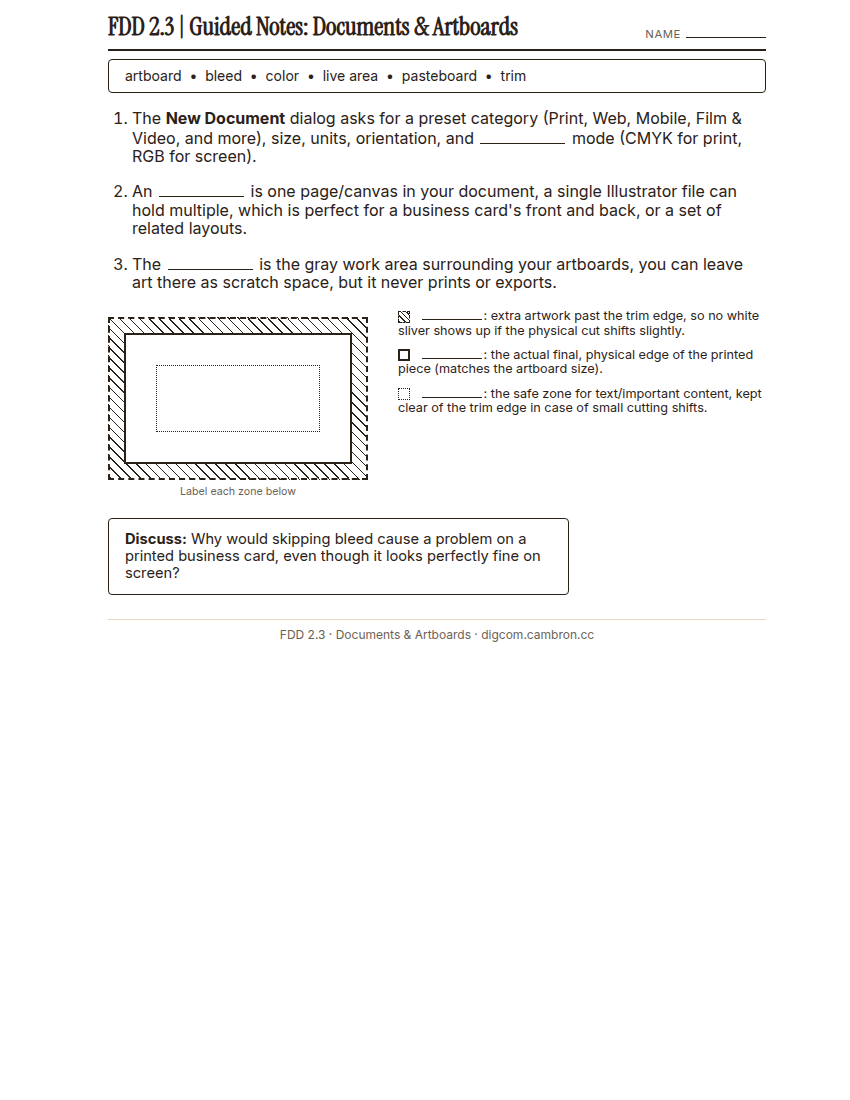
- The page(s)/canvas(es) within a single Illustrator document. One file can hold multiple artboards. For example, the front and back of a business card, or a whole set of related layouts. And only what’s inside an artboard’s bounds prints or exports.
- Pasteboard
- The gray work area surrounding your artboards. You can leave art there as scratch space or a holding area, but nothing on the pasteboard ever prints or exports.
- Bleed
- Extra artwork extended past an artboard’s trim edge, so that no thin white sliver appears along the edge of a printed piece if the physical cutting shifts slightly during production.
- Trim
- The actual, final physical edge of a printed piece. Matches the artboard’s set size.
- Live Area
- The safe zone kept clear of the trim edge for text and other important content, protecting it from being cut off if the trim shifts slightly.
Now that you know why Illustrator works the way it does, let’s tour where everything lives on screen, then use it to build a real document from scratch.
Direct Instruction (~15 min)
Complete the handout, three hole punch it, and keep it in your class binder.
⬇ Download Worksheet (PDF)Live in Illustrator, the teacher will point out each major zone in order: the Application Bar at the very top, the Control Panel just below it (context-sensitive—it changes depending on what’s selected), the Toolbar running down the side, Panels docked to the right (Layers, Swatches, Color, and more), and the Document Window in the center, showing your artboard sitting inside the larger gray Pasteboard.
“Watch what happens to the Control Panel when I select the Type tool versus when I select this rectangle. Same panel, completely different options, because it’s context-sensitive.”
Complete the handout, three hole punch it, and keep it in your class binder.
⬇ Download Worksheet (PDF)Click File > New to open the New Document dialog. Walk through its major fields together: a preset category (Print, Web, Mobile, Film & Video, and more), width/height and units, orientation, color mode (CMYK for print, RGB for anything screen-based), and, for print documents, a Bleed value.
“Notice this document can hold more than one artboard. If I’m designing a business card, I want the front and the back living in the same file, as two separate artboards, not two separate files.”
Scaffolded questions. Cold-call through all three:
Recall: “What’s the difference between the Toolbar and a Panel? And separately, what’s the difference between an artboard and the pasteboard?”
Analysis: “Why does a print document need bleed, but a document meant only for a website never does?”
Synthesis/Extension: “If you were printing a foldable brochure with 3 panels, how many artboards would make the most sense, and why?”
Guided Practice | Build a Multi-Artboard Document (~26 min)
- File > New: create a Print document, Letter-adjusted to a business-card size (3.5” × 2”), CMYK color, with 3 artboards and 0.125” bleed set in the dialog before clicking Create.
- Rename each artboard using the Artboards panel (double-click a name to edit): call them “Front,” “Back,” and “Alt Version” instead of leaving the defaults.
- Turn on View > Show Bleed (if not already visible) and draw one shape on the “Front” artboard that intentionally extends past the trim edge into the bleed area.
- Point to each interface zone as you use it: name the Toolbar, the Control Panel, and the Panels dock out loud as you reach for each one.
- Check with a partner: confirm each other’s artboard names and bleed setting before moving on.
- Save your file as
LastName_FirstName_2_3_Artboards.ai.
If you forgot to set bleed when creating the document, is it too late to add it? (Hint: check File > Document Setup.)
GMetrix/BrainBuffet (~22 min)
Start Module 1: Getting Started: today’s sections cover the interface and new documents directly, matching what you just practiced.
Exit Ticket / Wrap-Up (~5 min)
What’s one real consequence of skipping bleed on a piece that’s actually going to be printed and cut?
🗂 Organize: Put your guided notes in your binder. Save your multi-artboard .ai file in the Project Files folder of your Digital Design project folder on Google Drive.
📤 Exit Ticket: Emoji Meter. On a scrap of paper, draw ONE face that matches how confident you feel about today’s skill: 🙁 (not yet), 😐 (getting there), or 🙂 (got it). Then explain why in at least 3 sentences (aim for 5), connecting your answer to something specific from today, not just a general feeling.
Stuck on how to start? Try: “I drew ___ because ___. Specifically, when I tried to ___, I ___. Next time I want to ___.”